If you’ve ever wanted to push your plants to their limits, mainlining is what you’ve been looking for. Mainlining cannabis requires a little bit of work and patience early on, but you can set yourself up with a true monster of a plant. With just a few simple steps, you can up your next harvest significantly.
- What is mainlining?
- Mainlining weed; A step-by-step guide
- Preparation stage
- Early vegetative stage
- Step 1: Selecting the right pot
- Step 2: The first topping
- Step 3: The second topping and first training
- Step 4: The final topping and more training
- Step 5: Pruning and training
- Flowering a mainlined plant
- Pros and cons of mainlining cannabis plants
- 5 Tips & tricks for mainlining weed
Growers are always looking to get the most out of their plants and there’s no shortage of tips, tricks, and hacks out there aimed at that. One of the more recent developments is the practice of “mainlining” cannabis plants. This process is all about crowing the most colas at the most uniform size per plant.
In short, mainlining involves creating a number of equally-sized stalks that will each develop into a single cola. By eliminating lateral growth, growers can maintain a uniform canopy and create plants that have the potential for a tremendous yield.
What is mainlining?
OK, before we get started, there are a few terms that need to be cleared up: mainline and manifold.
- Mainline: This is the technique of growing to encourage the growth of multiple large, dense colas.
- Manifold: This is the actual structure of the plant that allows growers to do this.
With that out of the way, what actually is mainlining? Mainlining is a fairly high-stress training technique that involves repeatedly topping your plants at regular intervals. This creates a manifold where every branch is an equal distance from the roots and allows plants to grow multiple uniform colas.
Mainlining weed; A step-by-step guide
If you want to try your hand at mainlining a plant, you’ll need to make that choice early and start making preparations as soon as your seeds germinate.
Preparation stage
While any strain can be mainlined, some are certainly better than others, and selecting the right strain will make your entire grow so much easier. Some of the major things to consider are:
- Growth pattern: Strains that have short internodal spacing, symmetrical growth, and multiple robust side branches are ideal for mainlining.
- Height: Mainlining is all about growing your plant out instead of up. You don’t want anything too short or the amount of time needed to vegetate it to a reasonable size will simply be too much. Likewise, something too tall can quickly become unwieldy and take up too much space.
- Resilience: Mainlining is an incredibly high-stress training technique. As such, you need a strain that is known for its durability and flexibility.
Strains like NYC Diesel, Chemdawg, and Girl Scout Cookies all make excellent choices for mainlining.
Can I use autoflowering seeds for mainlining?
No. Since mainlining requires so much time in the vegetative state, autoflowering seeds are not compatible with this technique.
How much space do I need for mainlining?
Mainlining cannabis plants requires a fair amount of horizontal space. If a single plant needs about 45×45 cm, a properly mainlined plant can easily require 2-4 times that space. The entire point of this technique is to grow one larger plant.
Early vegetative stage
Once your seedlings have been germinated and transplanted, it’s time to get started. The process of mainlining is fairly straightforward, but it also requires fastidious attention to detail. So, without further ado, here’s how to mainline your weed plants.
Step 1: Selecting the right pot
Mainlining requires a significant amount of training and you’ll need to make sure that your pot can handle it. Fabric pots make the best choice (not just for mainlining, but overall as they allow the greatest aeration of the roots) but they still need some modification.
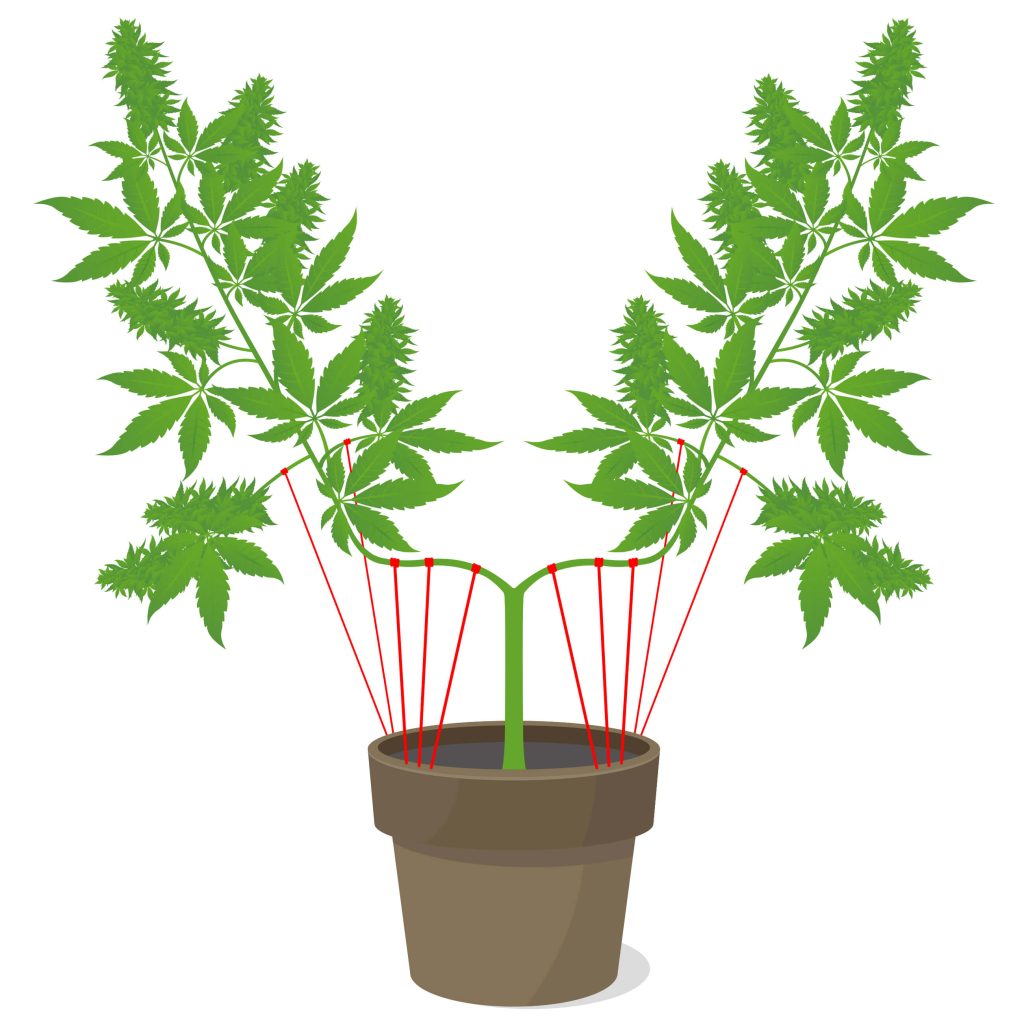
While there are special training pts out there that have holes already made in them, any fabric pot will work. Simply create 8 small holes evenly placed around the top of the pot. These are where you’ll be tying down your branches to give them adequate space to grow.
Step 2: The first topping
This is where the magic happens and it’s the most vital step in the entire process. Topping too early means that the plant won’t have had enough time to prepare for the stress and doing it too late means that you’ve wasted time.
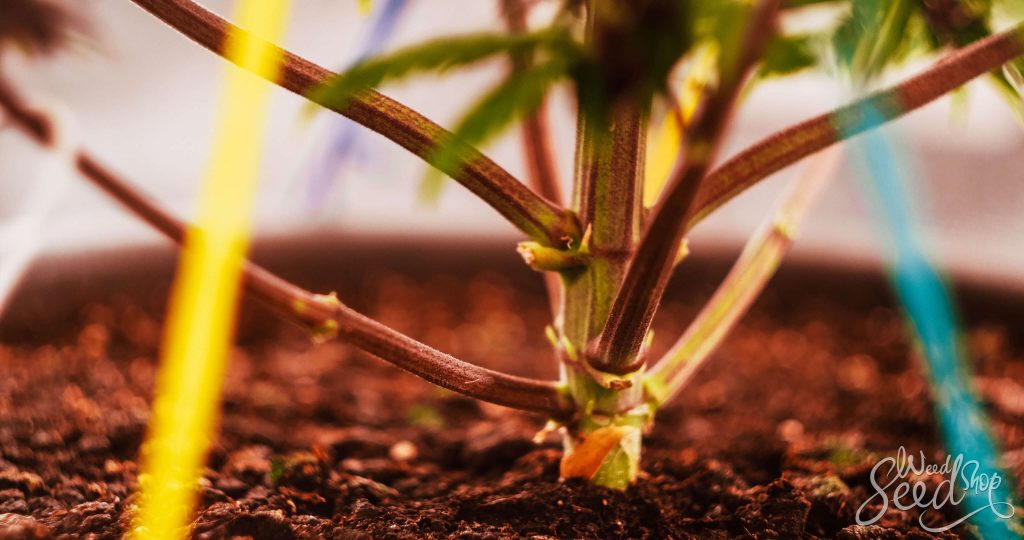
To mainline a cannabis plant, wait until the fifth node has started to appear. Once the plant has 5 pairs of leaves, cut the top off just above the third node being sure to leave behind a small section of stem (<1 cm). This will then force the plant to grow into two even branches that will form the basis of your manifold. After 2-3 days, remove all leaves below the third node. You should have a short stalk with two main leaves growing off in opposite directions.
It’s important to give the plant time between the first topping and the lower pruning. Putting too much stress on a plant this young at once can kill it. Mainlining requires patience.
Step 3: The second topping and first training
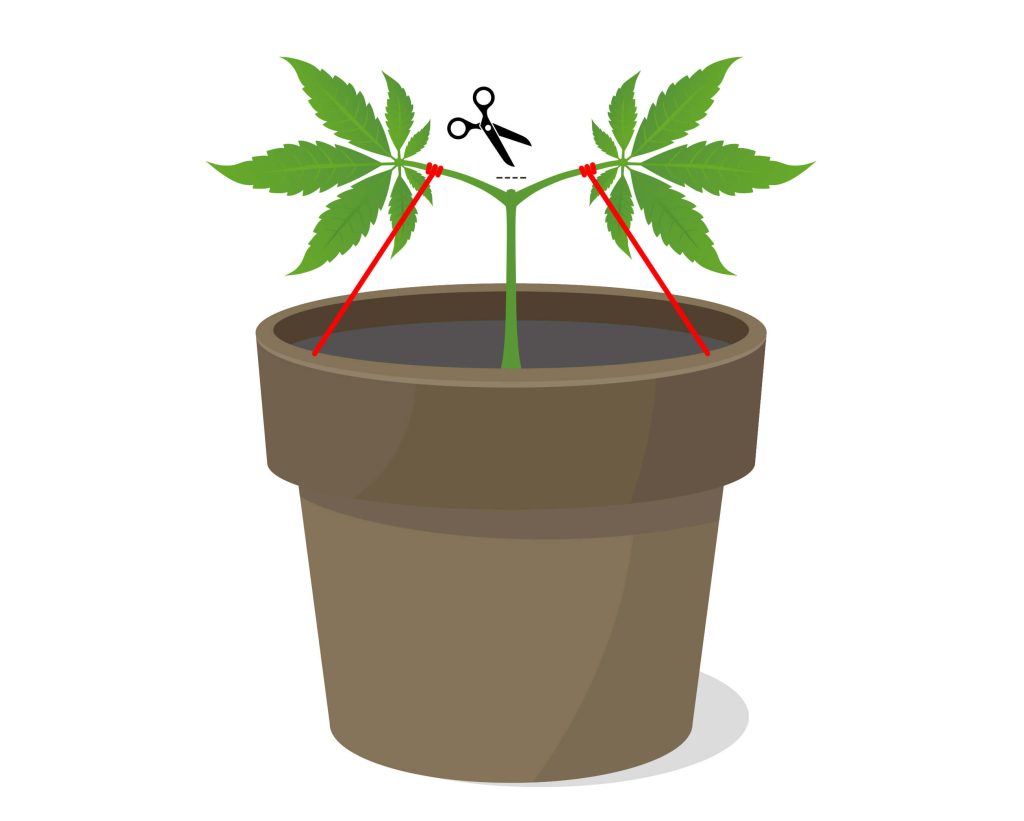
Over the next 2 weeks or so, you’ll start to see the plant undergo its first structural change as the nub above the two leaves left behind grows into two stalks with new growth. Once these new branches have grown 3-5 new nodes, it’s time for the second topping.
This time, you don’t need to trim at the third node, in fact, it’s usually best to trim just above the first (again, above the leaves and leaving a small bit of stem). What’s most important, though, is symmetry. Every branch should be an equal distance from the base of the plant. At this point, your plant should have two fan leaves at the bottom and two main branches.
Once these new branches are about 7-10 cm long, it’s time to start training. You’ll need some soft garden ties and a bit of finesse but it’s incredibly straight-forward. Tie one end of your garden tie to one of the holes in your pot and pull one of the branches down so that it is just below the horizontal. Then, tie the other end of the garden tie around it. This will keep it in place and force the plant to grow outwards instead of upwards; for at least a few days.
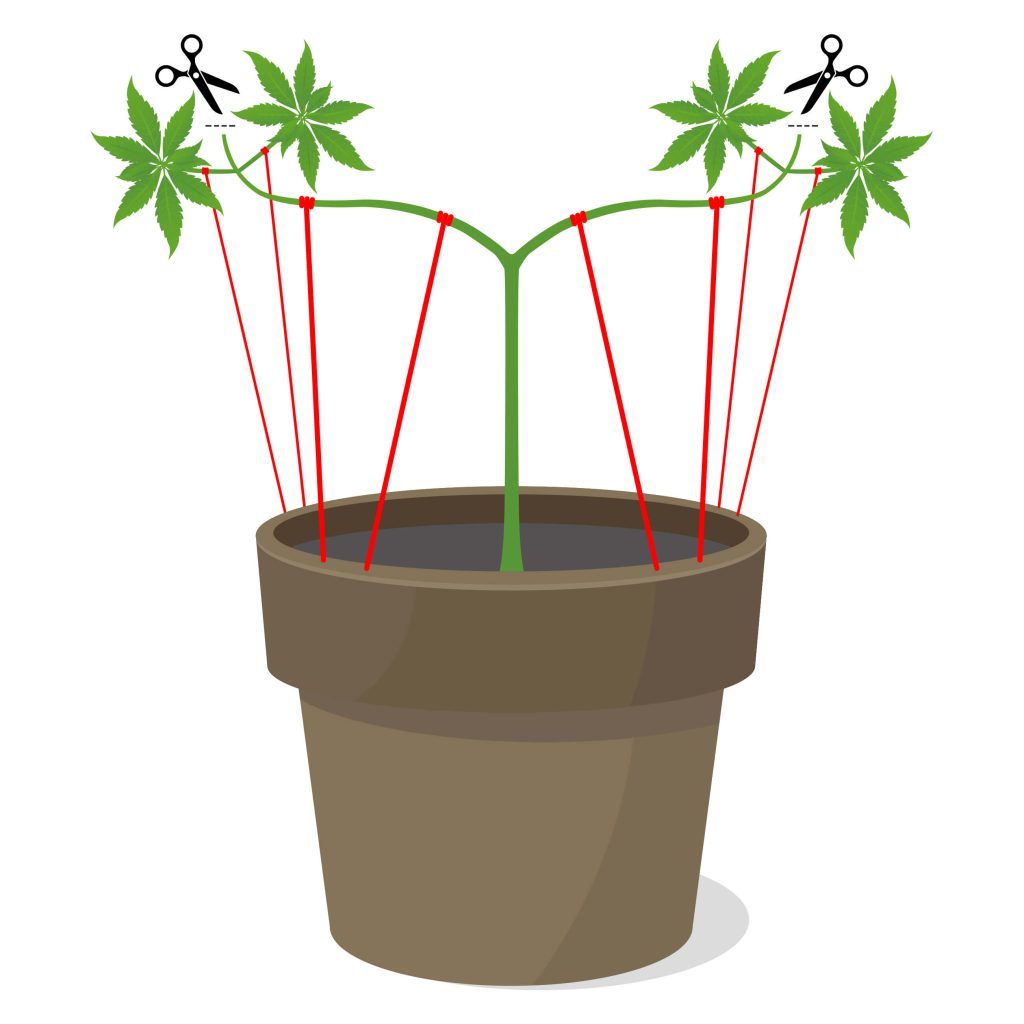
Step 4: The final topping and more training
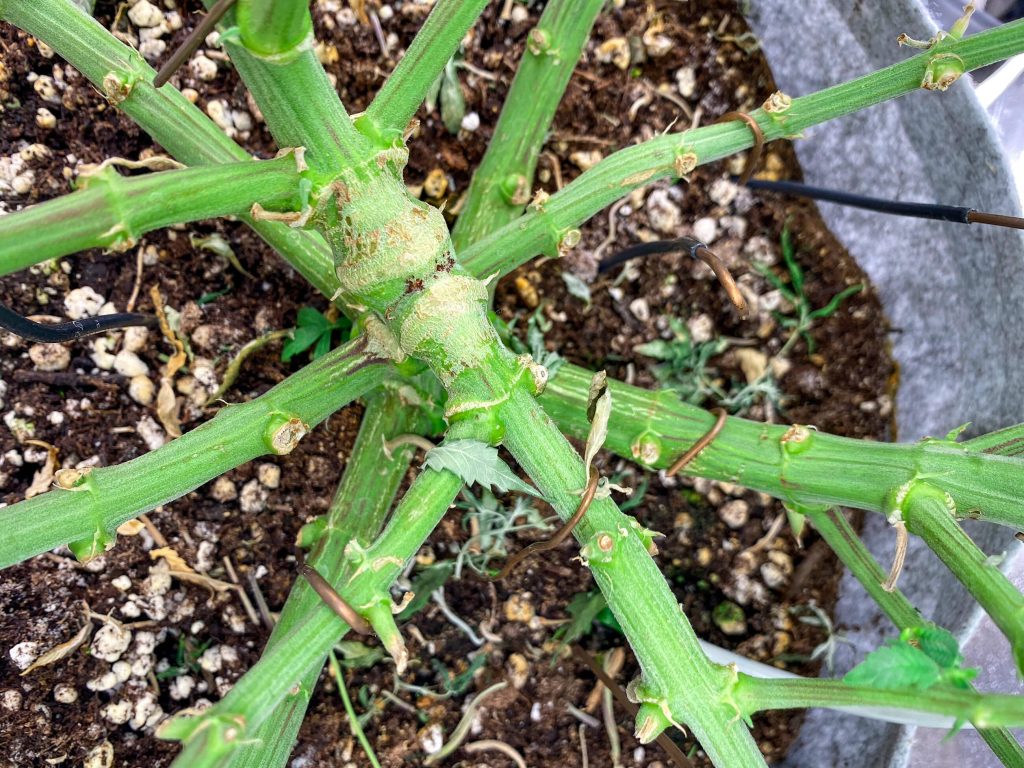
Once again, you’ll want to wait close to two weeks after the second topping. Wait until the new branches (there should be 4 at this point) are about 10-15 cm long and tie them down two to create 4 evenly-spaced horizontal stems. Once they’ve been tied down, it’s time to top them for the last time. Once again, just above the third node makes a good choice, but it can also be done above the first. This will give you 8 perfectly even colas in the end.
In theory, there’s no limit to how many times you can repeat this process. However, most growers (especially indoors) find that going beyond 8 or 16 shows diminishing returns.
Step 5: Pruning and training
After another 10-15 days (close to 6 weeks after planting) it’s time to start getting the plant ready for flowering. The most important thing to do at this point is to remove any leaves that are already showing signs of yellowing There will be some, this is a very stressful thing to do to a plant) as well as any leaves that aren’t getting light or are blocking airflow. Basically, everything below the top leaves on each branch.
Finally, tie these new branches down to make sure that they grow away from each other and don’t compete for light. Once this is done, you’re all ready to switch over to flowering.
Flowering a mainlined plant
Flowering is as easy as switching your lights and nutrients. For the first few weeks, you’ll likely see an explosion of vertical growth, or “stretch”, that you’ll need to manage properly to maximise your yield.
Luckily, there are a few simple steps that you can take to keep your plants from getting out of control. First, make sure that your light isn’t too far. Since you should have a perfectly even canopy, keeping your light at the proper distance should be easy. For LEDs, keep them 15-20 cm above the plant; for HPS bulbs, you’ll want at least 30-45 cm depending on the heat.
Secondly, low-stress training (LST) is a must. Continue to pull the main branches away from the centre of the plant to maximise the area receiving light.
Over the next few weeks, you’ll see more and more flowers take over your plants. And not little popcorn nugs but full colas growing from every site. During this time, be sure to continue to prune your plant to make sure that all of the leaves are getting adequate light and that the centre of the plant has enough airflow.
Congratulations! You’re done! You’ve successfully mainlined your plant. Next up, harvesting and curing.
Related post

Pros and cons of mainlining cannabis plants
If this seems like a lot of time and effort, you’re half right. Mainlining cannabis plants does require a significant amount of time to properly top and train and that’s time that could be spent growing more plants. But what this technique lacks in speed, it more than makes up for in yield and bud quality.
Pros of mainlining cannabis
- Increased yields
- Greater light penetration
- Optimised flower growth
- Control over plants’ shape/size
- Improved airflow
- Adaptable for smaller spaces
Cons of mainlining cannabis
- Time- and labour-intensive
- Highly stressful for the plant
- Not ideal for new growers
- Slower
- Reduced plant count
Related post
5 Tips & tricks for mainlining weed
While mainlining isn’t necessarily “hassle-free” there are several steps that can be taken to make it easier.
1. Keep it trimmed
Keeping your plant properly pruned will make sure that all of the flowering sites get adequate light. Always remember to prune off unnecessary fan leaves before flowering.
2. Only mainline healthy plants
It can’t be stressed enough (pun intended): mainlining is very stressful for the cannabis plant. If you try to top and train a plant that isn’t ready, you’ll only succeed in killing it. Even if it takes 3 weeks to perk up after being topped, give it time.
3. Check it regularly
Symmetry is the name of the game with mainlining. You should be checking and training your plants no fewer than 3 times a week (ideally every day). Be sure to keep things evenly spaced from each other as well as at a uniform height.
4. Seeds work better than clones
While cannabis clones can be mainlined, their irregular growth pattern is less than ideal. If you can, always choose to start from seeds for this technique.
5. Be gentle
Weed plants are hearty, but not indestructible. While tying branches down, don’t tie them too tightly. The plants will grow thicker and a tight tie will restrict or even kill a branch. Likewise, don’t tie your branches down too far. If you feel resistance, stop pulling.
Mainlining weed plants is a tedious and laborious strategy, but also fairly easy. If you’ve got the time and commitment, it can be an incredibly rewarding technique that is all but guaranteed to up your per-plant yields.
Got any other questions we didn’t answer? Tips that we forgot? Be sure to let us know in the comments.